Case Study: VisionaryOptics.com Case Study: VisionaryOptics.com
  • About
  • Blog
  • Code
  • About
  • Blog
  • Code
  •  
Case Study: VisionaryOptics.com

Checkout modernization, prescription uploads + OCR, and payments expansion (WooCommerce)

Client: Visionary Optics

Platform: WooCommerce

Role: Peter Alcock — hands‑on lead (architecture + implementation)

Highlights: Prescription upload with OCR at checkout; multi‑processor payments (incl. crypto); measurable revenue lift in year one. 

 The challenge

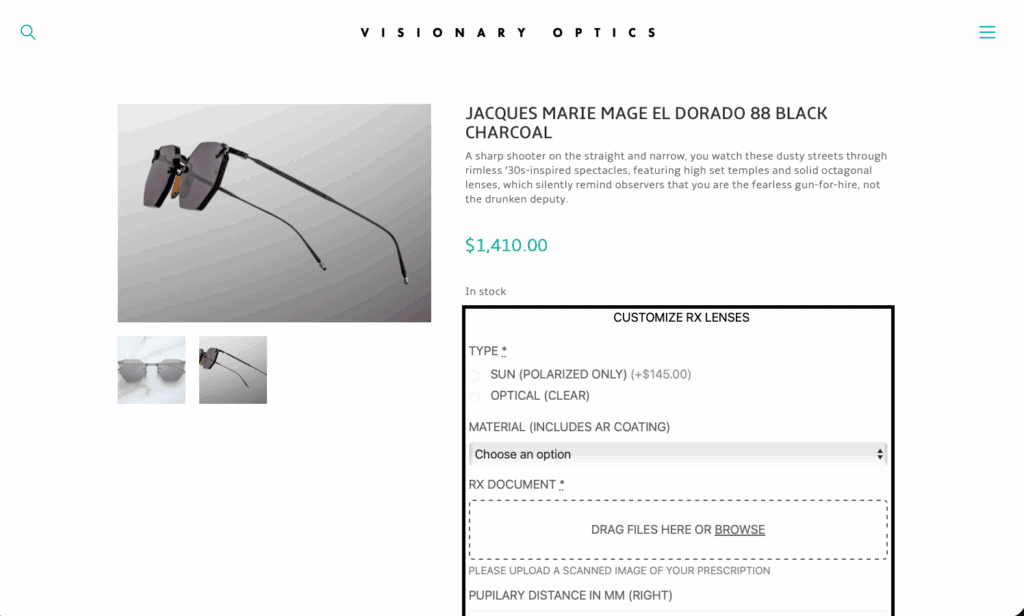
Visionary Optics needed a smoother path from product page to paid order—including a way to collect prescriptions during checkout and parse them automatically, and to accept more payment options without creating operational overhead.

—

 What I built

* Secure prescription upload at checkout with automated OCR parsing of key fields to reduce manual entry and speed fulfillment. (Referenced in my project summary on *page 3* of the uploaded application.) 

* Payments expansion by integrating multiple processors, including a cryptocurrency option, while keeping the rest of the checkout flow unchanged for shoppers. (Also noted on *page 3*.) 

* WooCommerce customization focused on reliability and visibility (clean error handling, basic instrumentation/logging, and admin‑friendly settings) so the team could self‑serve common changes. 

* Tight client cadence: routine working sessions to iterate quickly on UX, validation, and operations fit. (*page 3*) 

—

 Results

* +$106,000 in incremental sales in the first year, attributed to the new checkout + payments work. 

* Approximately a 3× ROI in year one on the engagement. 

* Broader payment acceptance (incl. crypto) with no disruption to the existing checkout. 

> Source: figures and scope as summarized in Peter’s application responses (*page 3* of the uploaded document). 

—

 Approach & principles

* Keep the shopper happy: fast pages, minimal extra steps, clear “why” when we ask for a prescription.

* Design for the ops team: make uploads legible, parsed, and easy to audit; keep settings in the admin.

* Small, safe iterations: ship behind flags, measure, then widen rollout.

* Own the edge cases: retries, idempotency where needed, and thorough request/feature tests around checkout.

—

 Tech notes

* Stack: WooCommerce (WordPress), custom PHP/JS, OCR service integration, multiple payment gateways (plus a crypto processor). 

* Key extensions: checkout flow hooks, file‑handling + validation, background parsing, and admin tools.

—

 Before → After (at a glance)

* Manual prescription handling → Upload + automated parsing at checkout. 

* Single/limited payments → Multiple processors and a crypto option. 

* One‑off customizations → Configurable features the team can tune without code.

Read More
HOW TO USE A.I. AND RSS FEEDS TO MAKE MONEY BETTING ON EVERYTHING ALL DAY LONG

Explanation of the key parts & caveats

  • Database: We store events, markets, and snapshots so you can later backtest, compute historical features, or track resolved outcomes.
  • Market fetching & filtering: You fetch all markets and heuristically filter “economic” ones using token matching. You may instead use metadata or event categories if the API supports it.
  • Signal / model: The simple model takes the implied probability (i.e. price) and then adjusts it based on naive sentiment from news titles. That’s extremely simplistic; you’ll want to replace that with a more rigorous model (e.g. time-series regression, macro forecasts, natural language sentiment, etc.).
  • Confidence score: Here we base it on the absolute difference between model vs implied, scaled. You could also consider liquidity, volume, variance in historic predictions, or ensemble consistency.
  • Background / news lookup: We do a simple Google search and parse the top titles. In practice, you might want to integrate a proper news API (e.g. NewsAPI, RSS from Bloomberg / Reuters / Econ blogs) for more reliable results.
  • Bet selection: We pick the highest-confidence non-neutral signal as the “best bet” for that run.

Extensions & improvements you should consider

  1. Better filtering of economics events
    Use event metadata from Kalshi (if available) instead of string heuristics.
  2. Time series / feature engineering
    Use historical snapshots, price movement, volume trends, volatility, momentum, etc., to build features.
  3. Sentiment / NLP model
    Use a proper sentiment analysis / news scoring model (e.g. from HuggingFace or OpenAI) rather than naive word matching.
  4. Risk management / position sizing
    Don’t bet too much; consider limiting exposure, hedging across correlated markets, etc.
  5. Backtesting and evaluation
    Over time, compare your model’s predictions to actual outcomes to refine weights and calibration.
  6. Automated trade execution
    Once your confidence is high, you can integrate the “place order” API endpoints and manage execution, slippage, etc.
  7. Rate limits, error handling, retries
    Add logic to handle API errors, HTTP rate limits, and network issues.
  8. Caching / incremental updates
    Instead of fetching all markets every time, just fetch changes / new snapshots.
  9. Better news retrieval
    Use RSS / API feeds from major economic news sources (Bloomberg, Reuters, Fed announcements, etc.), not raw Google scraping.
  10. Ice cream.

Welcome to the world where betting, machine intelligence, and markets collide. The goal of this project is simple (yet audacious): let AI identify value bets on economic prediction markets, automatically fetch background data, and rank the best bet with an explanation + a confidence score. In short: “Use AI to bet on f*cking everything.”

In this post, I’ll walk you through:

  1. Why betting on prediction markets is an interesting use case
  2. How the Kalshi API works (authentication, fetching markets, etc.)
  3. The architecture of the Python script
  4. How the model / signal is constructed
  5. Some caveats, risks, and ideas for improvement
  6. A worked example / thought experiment
  7. Next steps

Why prediction markets + AI?

Prediction markets (like Kalshi) let users trade binary “yes/no” contracts about future events. The current market price of a contract (e.g. $0.40) can be interpreted as the implied probability that the “yes” outcome will happen (e.g. 40 %). Thus, these markets aggregate collective information and beliefs, and respond to new data in real time.

If you believe your AI / model / research can predict better than the market (or at least differently in a useful way), you can try to exploit that difference.
This is akin to “value betting” in sports or financial markets: find cases where your estimated probability > market-implied probability → expected value (EV) > 0. Boyd’s Bets+1

Prediction markets also have advantages:

  • They are often more efficient and transparent (no hidden “vig” or juice like a sportsbook).
  • They cover many domains (economics, events, politics), not just sports.
  • The framework naturally lends itself to combining your own models + external data + sentiment.

Understanding the Kalshi API & authentication

API keys / signing requests

To interact with Kalshi programmatically, you need an API key. According to the docs:

  • Go to your account / profile settings → “API Keys” → “Create New API Key.” You will be given two parts: a key ID and a private key (RSA format). Kalshi API Documentation
  • The private key is only shown once — store it securely. You cannot retrieve it later. Kalshi API Documentation
  • Each API request must be signed using RSA over a concatenation of timestamp, HTTP method, and path. You also send the headers KALSHI-ACCESS-KEY (key ID), KALSHI-ACCESS-TIMESTAMP, and KALSHI-ACCESS-SIGNATURE. Kalshi API Documentation

Kalshi provides SDKs to help with signing / abstraction. The Python SDK (kalshi-python) is one of them. Kalshi API Documentation+1

Market / data endpoints

Once authenticated, you can use endpoints like:

  • get_markets — list markets (with paging / cursors)
  • get_event / get_market — fetch details of a specific event or market
  • get_trades, get_orderbook, etc. — get historical trades, price depth, etc.

The API also supports public (unauthenticated) endpoints for market listing. The docs recommend starting with public endpoints like GetMarkets before diving into authenticated ones. Kalshi API Documentation

Using this API, our script fetches all markets, filters those tied to economic / macro events, and stores their latest prices, volumes, etc.


The architecture: how the script works (at a glance)

Here’s the high-level flow:

  1. Initialize / create a SQLite database with tables for events, markets, snapshots, and model signals.
  2. Fetch all markets (via pagination) using the Kalshi API.
  3. Filter markets whose name / ticker suggests they are economic (CPI, inflation, interest rates, GDP, unemployment, etc.).
  4. Insert or update the markets and event info into SQLite; also insert a snapshot entry (price, timestamp, volume).
  5. For each economic market, compute a “signal” — that is, compare the market-implied probability (based on price) vs. your model’s probability (augmented by news / sentiment).
  6. Rank signals by confidence, pick the strongest, and output the “best bet” with explanation and supporting news.

Optionally, one could extend this to automated trading (placing orders) if confidence is high enough.


Model / signal: comparing implied vs estimated + news

Here’s the intuition:

  • The market-implied probability equals yes_price (e.g. 0.40) for the “yes” side (and 1 - yes_price for “no”).
  • Your model tries to estimate a “true” probability for “yes” (based on your data, forecasts, sentiment).
  • If model_prob > implied_prob + margin, that suggests value in betting “yes.”
  • If model_prob < implied_prob - margin, you might bet “no.”
  • Otherwise, the difference is too small → no bet.

In the prototype, we used a naive sentiment bias derived from news headlines:

  • We fetch a few news titles about the event (e.g. “CPI inflation surge expected”)
  • If words like “rise”, “surge”, “increase” show up, we add a small positive bias; if “fall”, “decline”, etc., we subtract a bias
  • Then clamp the resulting model probability into [0.01, 0.99]
  • Confidence is a function of how far model and implied diverge (scaled).

This is oversimplified, but it gives the framework to plug in any more advanced model (ML, time series, NLP, etc.).


import sqlite3
import time
import json
import requests
import math
from datetime import datetime, timezone
from kalshi_python import Configuration, KalshiClient
from urllib.parse import quote_plus

# (Optional) for news / web search
from bs4 import BeautifulSoup

# ========== Configuration & setup ==========

API_KEY_ID = "your_api_key_id"
PRIVATE_KEY_PEM = """-----BEGIN PRIVATE KEY-----
...
-----END PRIVATE KEY-----"""

# Base API host (use demo or production as appropriate)
API_HOST = "https://api.elections.kalshi.com/trade-api/v2"

config = Configuration(host=API_HOST)
config.api_key_id = API_KEY_ID
config.private_key_pem = PRIVATE_KEY_PEM
client = KalshiClient(config)

# SQLite setup
DB_PATH = "kalshi_econ.db"

def init_db():
    conn = sqlite3.connect(DB_PATH)
    c = conn.cursor()
    # event table
    c.execute("""
    CREATE TABLE IF NOT EXISTS events (
        event_ticker TEXT PRIMARY KEY,
        name TEXT,
        category TEXT,
        close_ts INTEGER,
        resolution TEXT
    )""")
    # market table
    c.execute("""
    CREATE TABLE IF NOT EXISTS markets (
        market_ticker TEXT PRIMARY KEY,
        event_ticker TEXT,
        yes_price REAL,
        no_price REAL,
        last_trade_ts INTEGER,
        volume REAL,
        FOREIGN KEY(event_ticker) REFERENCES events(event_ticker)
    )""")
    # trade history / snapshots
    c.execute("""
    CREATE TABLE IF NOT EXISTS market_snapshots (
        snapshot_id INTEGER PRIMARY KEY AUTOINCREMENT,
        market_ticker TEXT,
        ts INTEGER,
        yes_price REAL,
        no_price REAL,
        volume REAL
    )""")
    # optional: your model signals / bets
    c.execute("""
    CREATE TABLE IF NOT EXISTS model_signals (
        id INTEGER PRIMARY KEY AUTOINCREMENT,
        market_ticker TEXT,
        ts INTEGER,
        implied_prob REAL,
        model_prob REAL,
        signal TEXT,
        confidence REAL
    )""")
    conn.commit()
    conn.close()

# ========== Fetch & store data ==========

def fetch_all_markets(limit=1000):
    """Fetch all markets via pagination"""
    all_markets = []
    cursor = None
    while True:
        resp = client.get_markets(limit=limit, cursor=cursor)
        data = resp.data
        for m in data.markets:
            all_markets.append(m)
        cursor = data.cursor
        if not cursor:
            break
        # rate-limit sleep if needed
        time.sleep(0.2)
    return all_markets

def filter_economic_markets(markets):
    """Filter markets whose underlying event is economic in nature."""
    econ = []
    for m in markets:
        # Some heuristics: check event ticker or market name or category containing “CPI”, “Fed”, “inflation”, “GDP”, etc.
        name = m.name.lower() if hasattr(m, "name") else ""
        ticker = m.market_ticker.lower()
        if any(tok in name for tok in ["cpi","inflation","fed","gdp","unemployment","rate","ppi"]):
            econ.append(m)
    return econ

def store_markets(markets):
    conn = sqlite3.connect(DB_PATH)
    c = conn.cursor()
    for m in markets:
        # store event
        ev = m.event
        c.execute("""
            INSERT OR IGNORE INTO events(event_ticker, name, category, close_ts, resolution)
            VALUES (?, ?, ?, ?, ?)
        """, (ev.event_ticker, ev.name, ev.category if hasattr(ev, "category") else None,
              ev.close_ts, ev.resolution if hasattr(ev, "resolution") else None))
        # store market
        yes_price = None; no_price = None
        # The API may return “last_price” for yes side and no = 1 - yes (depending on representation). Adapt as needed.
        # Here, assume m.last_price is yes side, and no_price = 1 - yes_price.
        yes_price = m.last_price
        no_price = 1.0 - yes_price
        c.execute("""
            INSERT OR REPLACE INTO markets(market_ticker, event_ticker, yes_price, no_price, last_trade_ts, volume)
            VALUES (?, ?, ?, ?, ?, ?)
        """, (m.market_ticker, ev.event_ticker, yes_price, no_price, m.last_trade_ts, m.volume))
        # snapshot
        c.execute("""
            INSERT INTO market_snapshots(market_ticker, ts, yes_price, no_price, volume)
            VALUES (?, ?, ?, ?, ?)
        """, (m.market_ticker, int(time.time()), yes_price, no_price, (m.volume or 0)))
    conn.commit()
    conn.close()

# ========== External news / background fetch ==========

def search_news_for_event(event_name, num=5):
    """Do a simple web search and return a list of (title, snippet, url)."""
    query = quote_plus(event_name + " outlook analysis 2025")
    url = f"https://www.google.com/search?q={query}"
    # (Note: Google search may block automated requests; you may need to use a search API.)
    headers = {"User-Agent": "Mozilla/5.0 (compatible)"}
    resp = requests.get(url, headers=headers)
    soup = BeautifulSoup(resp.text, "html.parser")
    results = []
    for g in soup.select(".kCrYT a"):
        href = g.get("href")
        if href and href.startswith("/url?q="):
            actual = href.split("/url?q=")[1].split("&sa=")[0]
            title = g.text
            results.append((title, "", actual))
            if len(results) >= num:
                break
    return results

# ========== Simple “model” & bet suggestion logic ==========

def compute_signal_for_market(market_ticker):
    """
    Get latest market, compute implied probability, build a naive model for true probability,
    then compute signal and confidence.
    """
    conn = sqlite3.connect(DB_PATH)
    c = conn.cursor()
    c.execute("SELECT yes_price FROM markets WHERE market_ticker = ?", (market_ticker,))
    row = c.fetchone()
    if not row:
        conn.close()
        return None
    implied = row[0]
    # *** Simple model: treat implied as base, then adjust by news sentiment ***
    # For demonstration: if latest news has strong language (“sharp rise inflation”) push model a bit.
    # A real model would parse economic forecasts, time series, etc.
    # Here we fetch news:
    c.execute("SELECT event_ticker FROM markets WHERE market_ticker = ?", (market_ticker,))
    evt = c.fetchone()[0]
    c.execute("SELECT name FROM events WHERE event_ticker = ?", (evt,))
    ev_name = c.fetchone()[0]
    news = search_news_for_event(ev_name, num=3)
    # Very crude sentiment: if news titles contain “rise”, “surge”, “jump” → upward bias
    bias = 0.0
    for title, _, _ in news:
        t = title.lower()
        if "surge" in t or "rise" in t or "increase" in t or "jump" in t:
            bias += 0.02
        if "fall" in t or "decline" in t or "drop" in t:
            bias -= 0.02
    model_prob = implied + bias
    # clamp
    model_prob = max(0.01, min(0.99, model_prob))
    signal = None
    if model_prob > implied + 0.01:
        signal = "bet_yes"
    elif model_prob < implied - 0.01:
        signal = "bet_no"
    else:
        signal = "no_bet"
    # Confidence: based on magnitude of difference and number of sentiment signals
    diff = abs(model_prob - implied)
    confidence = min(1.0, diff * 5)  # e.g. if diff=0.1 → confidence=0.5
    conn.close()
    return {
        "market_ticker": market_ticker,
        "implied_prob": implied,
        "model_prob": model_prob,
        "signal": signal,
        "confidence": confidence,
        "news": news
    }

def choose_best_bet(signals):
    """
    Among signals, pick the one with highest confidence (and non-neutral) as the “best bet”.
    """
    best = None
    for s in signals:
        if s["signal"] != "no_bet":
            if best is None or s["confidence"] > best["confidence"]:
                best = s
    return best

# ========== Main orchestration ==========

def main():
    init_db()
    print("Fetching markets …")
    markets = fetch_all_markets(limit=500)
    print(f"Fetched {len(markets)} markets")
    econ_markets = filter_economic_markets(markets)
    print(f"Filtered {len(econ_markets)} economic markets")
    store_markets(econ_markets)
    # compute signals for each econ market
    signals = []
    for m in econ_markets:
        sig = compute_signal_for_market(m.market_ticker)
        if sig:
            signals.append(sig)
    # pick best bet
    best = choose_best_bet(signals)
    if best:
        print("=== Best bet recommendation ===")
        print(f"Market: {best['market_ticker']}")
        print(f"Signal: {best['signal']}")
        print(f"Model prob: {best['model_prob']:.3f}, Implied prob: {best['implied_prob']:.3f}")
        print(f"Confidence: {best['confidence']:.3f}")
        print("News influencing decision:")
        for title, _, url in best["news"]:
            print(f" - {title} → {url}")
    else:
        print("No strong bet signal at this time.")

if __name__ == "__main__":
    main()

This approach mirrors the core idea of “value betting” in sports: convert odds → implied probability; compare with your own estimate; bet when you believe your estimate is more accurate. OddsHaven+2OddsShopper+2
It also echoes the principle that calibration (the match between predicted probabilities and actual frequencies) is often more valuable in betting models than mere accuracy. arXiv


Code walkthrough (key parts)

Here’s a deeper dive into important segments:

Database & schema

We create tables:

  • events(event_ticker PRIMARY KEY, name, category, close_ts, resolution)
  • markets(market_ticker PRIMARY KEY, event_ticker, yes_price, no_price, last_trade_ts, volume)
  • market_snapshots(snapshot_id, market_ticker, ts, yes_price, no_price, volume)
  • model_signals(id, market_ticker, ts, implied_prob, model_prob, signal, confidence)

This structure lets you track historical price changes and how your model’s signals evolve over time.

Fetching & storing markets

The function fetch_all_markets() pages through results using cursor until exhausted.

filter_economic_markets() is a heuristic — it simply checks if the market or event name contains tokens like “cpi”, “inflation”, etc. You could improve this by relying on richer metadata from the API if available.

store_markets() inserts/updates market and event rows, plus snapshot logs.

Signal computation

compute_signal_for_market() is the meat of decision logic:

  • Reads the latest yes_price → implied probability
  • Fetches the event name → runs a simple Google search to get a few news titles
  • Computes a “bias” from those titles (rudimentary sentiment)
  • Sets model_prob = implied + bias (clamped)
  • Determines a signal (“bet_yes”, “bet_no”, or “no_bet”) based on margin
  • Assigns a confidence = min(1.0, diff * 5) as a scaling of how big the gap is

choose_best_bet() picks the signal with highest confidence (non-neutral).

Orchestration (main())

  • Initialize DB
  • Fetch markets
  • Filter & store
  • Compute signals for each econ market
  • Pick & print the best bet + explanation + news

You could extend this loop to run periodically (cron / daemon), track your bet results, or trigger trade execution.


Worked Example / Thought Experiment

Suppose one of the markets is:

Market: “Will U.S. CPI YoY exceed 4.0% in June 2025?”
Yes price: 0.35 → implied probability = 35%
No price: 0.65 → implied probability = 65%

Your AI model, using inflation data, Fed communications, supply chain indicators, etc., estimates that the true chance of CPI > 4.0% is 42%. Meanwhile, a recent news article says “inflation pressures intensifying — CPI expected to surge.” That gives a small positive sentiment bias (+0.02). So your model_prob = 0.35 + 0.02 = 0.37 (in practice you’d combine a stronger model, not just bias).

Since 0.37 > 0.35 + 0.01, your signal is “bet_yes” with a confidence proportional to (0.37 – 0.35).

If among all economic markets that has the greatest confidence, you choose that as your best bet. You then output the news articles that triggered the bias, plus the implied vs model probabilities, plus the confidence score.

You might execute a small position (e.g. fraction of bankroll using Kelly criterion or capped sizing) if confidence is high.


Strengths, limitations & improvements

Strengths

  • Modular / extensible: You can plug in better models (ML, ensemble, time series) instead of naive bias.
  • Transparent explanations: You output news, probability comparisons, and a confidence score so you understand “why” the recommendation.
  • Persisted history: Using SQLite lets you backtest, track signal performance, and refine over time.
  • Data fusion: You combine market data + external signals (news) in a unified pipeline.

Key limitations & risks

  • Naive sentiment model: The biasing from simple keyword matches is extremely fragile. Real news parsing / sentiment analysis (e.g. via NLP models) is needed.
  • Overfitting / data snooping: If you tailor your model too much to past events, you may “find patterns” that don’t generalize.
  • Market efficiency: Prediction markets may already price in most publicly available info. The alpha opportunity may be very small or disappearing fast.
  • Transaction costs / slippage / liquidity: Even if your model sees value, execution (bid/ask spreads, insufficient liquidity) may eliminate profit.
  • Confidence calibration: Your confidence scaling is ad hoc; better calibration (e.g. Bayesian, historical signal accuracy) is needed.
  • Legal / regulatory / financial risk: Betting/trading involves capital risk; always be cautious.

Suggested improvements

  1. Use an NLP / sentiment model (e.g. transformer) to score news, not just keyword heuristics.
  2. Use time series features: price momentum, volatility, cross-market correlations.
  3. Calibrate your confidence based on how past signals fared (e.g. a Bayesian score or rolling accuracy).
  4. Use proper bet sizing (Kelly criterion or fractional Kelly). Wikipedia
  5. Incorporate trade execution logic with risk controls (max stake, stop losses).
  6. Expand external data: macroeconomic reports, central bank minutes, expert forecasts, research papers.
  7. Run distributed / ensemble models and compare consistency across them.
  8. Include backtesting: simulate how your signals would have performed historically to validate your strategy.

Read More
Get Rich Quick: Ai For Gambling

Don’t hate the game.

This repository provides an AI-driven tool for generating creative NFL prop bets based on real-time NFL news headlines, she uses RSS feeds, natural language processing (NLP), sentiment analysis, and multiple LLMs to anticipate the psychophysiological effects today’s sports headline news will most likely have on the preparedness of individual NFL players and collectively as teams, in order to ultimately suggest prop bets to make related to NFL players estimated performances, with accompanying odds and betting recommendations.

Features

  • Headline Aggregation: Gathers NFL news headlines from a list of top RSS feeds.
  • Player Identification: Uses NLP (spaCy) to extract player names from headlines.
  • Sentiment Analysis: Analyzes sentiment in each headline related to the player to calculate an overall sentiment score.
  • AI-Generated Prop Bets: Creates unique prop bets using OpenAI’s API based on each headline.
  • Database Storage: Stores player data, headlines, sentiment scores, and generated prop bets in an SQLite database.

Installation

  1. Clone the repository:
   git clone https://github.com/peteralcock/getrichquick.git
   cd getrichquick
  1. Install required dependencies:
    Ensure you have Python 3.x installed, then run:
   pip install feedparser spacy textblob openai
   python -m spacy download en_core_web_sm
  1. Set up OpenAI API key:
    Replace sk-proj-3c39_W2Vsa... with your own OpenAI API key in the client initialization.

Usage

  1. Run the script:
    Execute the script to fetch headlines, process player names, analyze sentiment, and generate prop bets.
   python main.py
  1. Check Output:
  • Player profiles: Displays each player’s headlines and overall sentiment score.
  • Generated Prop Bets: Prop bets generated by the AI are stored in the SQLite database (nfl_players.db), under the prop_bets table.

Database Structure

  • players Table: Contains unique player IDs and aggregated sentiment scores.
  • headlines Table: Stores headlines associated with each player.
  • prop_bets Table: Contains AI-generated prop bets linked to each player and headline.

Example Workflow

  1. Fetch Headlines: Retrieves NFL headlines from specified RSS feeds.
  2. Identify Players: Extracts player names using spaCy’s Named Entity Recognition.
  3. Sentiment Analysis: Computes a sentiment score for each player based on their headlines.
  4. Generate Prop Bets: Uses OpenAI API to generate three creative prop bets for each headline related to a player.
  5. Save Results: Stores data in an SQLite database.

Warning

This tool is intended for entertainment purposes only and should not be used as a primary betting guide. Gambling carries financial risks, and prop bets generated are speculative.

Read More
Welcome To Rushmore: Ai-Powered Online Learning Platform For Educators

I’m thrilled to introduce Rushmore, an AI-powered SaaS e-learning platform I developed to revolutionize online course creation. Designed for educators, creators, and entrepreneurs, Rushmore simplifies the process of generating and selling lesson plans using artificial intelligence.


🎓 Welcome to Rushmore

Inspired by the spirit of learning and innovation, Rushmore allows you to teach yourself and others whatever you desire.By leveraging AI, you can instantly create comprehensive lesson plans and share your knowledge with the world.


🚀 Key Features

  • Modern Landing Page: Showcases features, pricing, and testimonials in a sleek, SaaS-style design.
  • User Authentication: Register or log in using email, Google, or Facebook accounts.
  • Course Creation:
    • Input a course title and optional sub-topics.
    • Select the number of topics to generate.
    • Choose between Image & Theory or Video & Theory course types.
  • AI-Generated Content: Automatically generates a structured list of topics and sub-topics based on your input.
  • Interactive Learning: Includes an AI chatbot for real-time Q&A during courses.
  • Export Options: Download entire courses as PDFs.
  • Course Certificates: Earn and download completion certificates, also delivered via email.
  • Subscription Management:
    • Offers Free, Monthly, and Yearly plans.
    • Supports payments through PayPal, Stripe, Paystack, Flutterwave, and Razorpay.
    • Manage subscriptions directly from your profile.
  • Responsive Design: Optimized for all devices and screen sizes.

🛠️ Admin Panel Features

  • Dashboard: Monitor users, courses, revenue, and more.
  • User Management: View and manage all registered users.
  • Course Oversight: Access and manage all user-created courses.
  • Subscription Insights: Track paid users and subscription details.
  • Content Management: Edit pages like Terms, Privacy, Cancellation, Refund, and Billing & Subscription.

⚙️ Getting Started

To set up Rushmore locally:

  1. Clone the repository:bashCopyEditgit clone https://github.com/peteralcock/Rushmore.git
  2. Navigate to the project directory:bashCopyEditcd Rushmore
  3. Install dependencies:bashCopyEditnpm install
  4. Configure environment variables:
    • Create a .env file with necessary credentials for MongoDB, authentication providers, and payment gateways.
  5. Start the application:bashCopyEditnpm start

Rushmore is more than just a tool; it’s a platform to empower educators and creators to share knowledge effortlessly. By automating course creation, it allows you to focus on delivering value to your audience.

Feel free to explore, contribute, or provide feedback on the GitHub repository. Let’s make learning accessible and engaging for everyone.

Happy teaching!

Read More
RoadShow: AI-Powered Under-priced Antique Analysis

As a developer passionate about blending technology with real-world applications, I embarked on a project to streamline the process of evaluating antique listings on Craigslist. The result is RoadShow, an application that automates the collection and analysis of antique listings, providing insights into their value, authenticity, and historical context.

🎯 The Challenge

Navigating through countless Craigslist listings to find genuine antiques can be time-consuming and often requires expertise to assess an item’s worth and authenticity. I aimed to create a tool that not only aggregates these listings but also provides meaningful analysis to assist collectors, resellers, and enthusiasts in making informed decisions.

🧰 The Solution

RoadShow is designed to:

  • Scrape Listings: Utilizes Puppeteer to collect antique listings from Craigslist NYC, ensuring efficient data retrieval with rate limiting and error handling.

  • Store Data: Saves listing details, images, and analysis results in a structured SQLite database for easy access and management.

  • Analyze with AI: Integrates OpenAI’s API to evaluate each listing, providing:

    • Estimated fair market value

    • Price assessment (underpriced, overpriced, or fair)

    • Authenticity evaluation

    • Tips for determining authenticity

    • Historical context and additional insights

🧠 How It Works

  1. Data Collection: The application uses Puppeteer to navigate Craigslist’s NYC antiques section, extracting relevant information from each listing.

  2. Data Storage: Extracted data, including images, are stored in a SQLite database, facilitating efficient data management and retrieval.

  3. AI Analysis: Each listing is analyzed using OpenAI’s API, generating comprehensive insights that are appended to the database records.

🚀 Getting Started

To explore or contribute to RoadShow, visit the GitHub repository: https://github.com/peteralcock/RoadShow

Read More
Let’s turn vibes into ventures

I started coding when I was 10 years old, before GitHub was a thing. It was Visual Basic 4.0 that hooked me into the world of native desktop software development. Growing up in the age of AOL exposed me to the world of “Punters & Progz”, hobbyist software applications that manipulated the Windows API to do things like scrape chatrooms for screen names or send mass messages with phishing lures or flood IMs to people in order to overflow the cache memory in the recipients’ client as to “punt” them offline when their program crashed from the overflow. The desire to create similar fire led me into learning the WINSOCK protocol as to write invisible client/server trojan horse viruses that buried themselves in the boot registry so I could prank my friends.

25 years later, I now have the power of LLMs to do all the grunt-work it used to take to pull these stunts. I feel like Mickey Mouse in Fantasia after he discovers the wizard’s magic wand. I can make the brooms do all my chores. Except in my scenario, I already know how to avoid flooding the castle.

Suddenly, I feel like I don’t have enough hands. There’s no more limits. I can make literally anything in under 2 weeks. So now, I don’t even know where to dedicate my time. There are so many possibilities that I’ve decided I’m going to listen to the crowd. I’m going to make an app every week based on the comments I get on this post and on my blog, where I’ll be documenting this experiment.

Leave your brilliant app idea as a comment, and once a week I’ll pick the most interesting one and prototype it for you, with a follow-up business plan on how we could monetize it. Consider this to be my speed dating marathon as I look for a new business partner. If you’re willing to do the marketing and operations, I’m willing to do the engineering, and together we can rule the galaxy.

Remember kids, real power is the power to get people to follow you, and an idea is worth nothing until executed. So leave your idea in the comments and let’s build something real. Something weird. Something nobody’s done before.
Because the future doesn’t belong to the smartest or the richest—it belongs to the fastest. And I’m moving at LLM-speed.

Whether it’s a dumb meme generator that goes viral, a fintech tool that saves people money, or a social app that connects people in a way they didn’t even know they needed—if your idea hits me right, I’ll bring it to life, right here, in public.

⚡ Drop your app idea in the comments.
🚀 I’ll build it in a week.
💸 We’ll map the business model together.

And if it takes off? You’re the cofounder.
Let’s turn vibes into ventures.

Read More
Gekko: AI Hedge Fund Simulation

The intersection of distinct human investment philosophies and the analytical power of AI presents a fascinating area for exploration. What happens when different, sometimes conflicting, legendary investment strategies are implemented by AI agents within the same simulated market environment? Gekko is a project designed to explore exactly that.

The Concept: Simulating Investment Minds

The core idea behind Gekko is to build a platform where AI agents, each modeled after the distinct philosophy of a well-known investor (like Warren Buffett, Cathie Wood, Ben Graham, etc.), can analyze market data and generate trading signals. It serves as a digital sandbox for experimenting with how these AI-driven strategies might interact and perform within a simulated hedge fund structure.

This isn’t about creating a live trading bot. Gekko is intended purely as an experimental and educational tool to observe how LLMs can interpret financial data and mimic strategic decision-making based on predefined investment personas.

Gekko’s Features

To achieve this simulation, Gekko incorporates several components:

  • Diverse AI Agents: A variety of agents represent different investment styles – value, growth, innovation, contrarian, technical analysis, sentiment analysis, and more.
  • Multi-Agent System: Agents process data and generate signals; these are then synthesized by portfolio and risk management layers to make simulated portfolio adjustments.
  • LLM Integration: Agents utilize Large Language Models (supporting OpenAI, Groq, and local Ollama instances) for data interpretation and reasoning.
  • Simulation & Backtesting: The platform includes a simulated trading engine and backtesting features to run strategies against historical data.
  • Dashboard Interface: A ReactJS frontend provides visualization of the simulated portfolio, trades, and agent outputs.
  • Reasoning Output: An option exists (--show-reasoning) to inspect the logic behind agent decisions, aiding in understanding the simulation.

Technical Aspects and Challenges

Developing Gekko involved several technical considerations. Key tasks included:

  • Translating nuanced investment philosophies into effective prompts for the AI agents.
  • Integrating various data sources (pricing, news, financials) via APIs for agent use.
  • Building a backend (using FastAPI) and simulation engine capable of handling the workflow.
  • Enabling flexible deployment through Docker.

Seeing how the different agent types process the same information and arrive at varied conclusions based on their programmed personas is one of the core outcomes of the simulation.

Future Directions

As an experimental platform, Gekko could potentially evolve. Further development might involve refining agent interactions, incorporating more sophisticated market data, or enhancing the simulation’s realism. It serves as a base for exploring AI applications in strategy analysis.

Explore and Experiment (Responsibly!)

Gekko is available for those interested in experimenting with AI in the context of financial strategy simulation.

Read More
ZEPSEC: An All-in-One Platform for Cybersecurity Management

Staying ahead of threats is crucial. ZEPSEC emerges as a comprehensive solution designed to manage vulnerabilities, track threats, and plan incident responses effectively. Let’s delve into what ZEPSEC offers and how it can benefit organizations in securing their digital assets every few minutes rather than months. (Six-month audit cycles are an absolutely ridiculous concept these days).

What is ZEPSEC?

ZEPSEC is a cybersecurity platform that provides a suite of tools for vulnerability management, Indicators of Compromise (IoC) database, and threat tracking. It is described as an all-in-one intelligent threat detection, vulnerability assessment, and incident response planning tool. The platform aims to help organizations stay ahead of cyber threats and secure their digital assets.

ZEPSEC offers several key features:

  1. Live Vulnerability Tracking: Continuously monitors and identifies vulnerabilities in real-time, allowing organizations to address them promptly.
  2. Real-Time Risk Notifications: Alerts users to potential risks as they arise, ensuring that security teams can respond quickly to emerging threats.
  3. Incident Response Planner: Assists in planning and executing responses to security incidents, helping to minimize damage and recover swiftly.
  4. Multi-Organization Ready: Designed to support multiple organizations, making it suitable for managed service providers or large enterprises with multiple divisions.
  5. AI-Powered Virtual CISO: Leverages artificial intelligence to provide expert guidance and recommendations, acting as a virtual Chief Information Security Officer.

Open-Source and Subscription Options

ZEPSEC offers an open-source version in Russian, targeted at experienced security professionals. For those who prefer English, there is an AI-assisted version available through a paid subscription. This dual approach allows both budget-conscious users and those needing language support to benefit from the platform.

For organizations looking to enhance their cybersecurity posture, ZEPSEC offers a comprehensive set of tools to manage vulnerabilities, track threats, and plan incident responses. With both open-source and subscription-based options, it caters to a wide range of users, from seasoned security experts to those seeking AI-driven guidance.

Sources:

  • ZEPSEC GitHub Repository
Read More
Aditude: 360 Digital Ad Management

Wanna run your own digital ad server? Well NOW YOU CAN!
Just clone my repository, and you can make BILLIONS!! (Maybe.)

Aditude is an open-source platform designed to simplify the creation, management, and delivery of digital advertisements. Unlike cloud-based ad management solutions that often come with subscription fees and dependency on third-party providers, Aditude is self-hosted, giving users full control over their data and infrastructure. It’s tailored for media companies, publishers, and website networks that want to sell and manage banner ads efficiently across multiple sites.

The project, as described on its GitHub repository, supports a range of ad formats, including GIF, JPG, PNG, HTML5, and external scripts like Google AdSense. It also offers features like responsive banner creation, payment integration, and multi-language support, making it a versatile tool for diverse use cases.

Key Features of Aditude

Let’s break down some of the standout features that make Aditude a compelling choice for ad management:

1. Simplified Banner Creation with Shortcodes

Aditude uses shortcodes to streamline banner creation. These placeholders are replaced during ad delivery, allowing users to create banners without diving deep into complex coding. For example, a shortcode might define a banner’s position or creative, making it easy to update campaigns dynamically. This feature is particularly useful for non-technical users who need to manage ads efficiently.

2. Support for Multiple Ad Formats

The platform supports a variety of ad formats, including:

  • Static banners: GIF, JPG, PNG.
  • HTML5 banners: Uploaded as ZIP files containing HTML, CSS, and JavaScript for interactive ads.
  • External scripts: Integration with platforms like Google AdSense for seamless third-party ad delivery.

This flexibility ensures that Aditude can handle both traditional and modern ad formats, catering to different advertiser needs.

3. Payment Integration

Aditude supports selling ads via PayPal and Coinbase, enabling crypto payments alongside traditional methods. Once a payment gateway is configured, advertisers can sign in, create campaigns, set budgets, and purchase ad slots. The system automatically calculates views or time duration based on the budget and can publish banners post-payment, streamlining the ad-buying process.

4. Responsive Banner Templates

Creating responsive banners that look great on all devices can be challenging, but Aditude simplifies this with built-in templates. Users can generate banners without writing code, making it accessible for those with limited design or development experience.

5. Multi-Language Support

For global publishers, Aditude’s multi-language support is a significant advantage. The platform can be configured to serve ads in different languages, ensuring a seamless experience for diverse audiences. Detailed instructions for setting this up are provided in the project’s configuration documentation.

6. Automated Banner Rotation

Aditude automatically rotates banners in designated positions, ensuring fair exposure for all active campaigns. This feature is crucial for media companies managing multiple advertisers across a network of websites.

7. Customizable User Experience

The platform allows customization of the login page and supports external login methods, giving administrators flexibility to align the system with their brand. Additionally, users can define sellable ad positions, tailoring the platform to their specific inventory.

8. Easy Setup and Scalability

Setting up Aditude is straightforward. After unzipping the files and placing them in the correct directory (with appropriate permissions like CHMOD 755 or 777), users navigate to the installation URL, input database credentials, and finalize the setup. Upon first login, Aditude creates example banners, positions, campaigns, and clients to help users get started quickly.

The platform is designed to scale, making it suitable for media companies operating networks of websites. It allows webmasters to configure ad positions and advertisers to purchase ads across the network, with robust tracking for payments and performance.

Why Choose Aditude?

Aditude stands out for several reasons:

  • Self-Hosted Control: By hosting Aditude on your own servers, you retain full control over your data and avoid reliance on third-party providers. This is a significant advantage for privacy-conscious organizations or those with specific compliance requirements.
  • Cost-Effective: As an open-source solution, Aditude eliminates recurring subscription costs, making it an attractive option for small to medium-sized publishers.
  • Flexibility: With support for multiple ad formats, payment gateways, and languages, Aditude adapts to a wide range of use cases, from single-site publishers to large media networks.
  • Ease of Use: Features like shortcodes, templates, and automated rotation make ad management accessible to users with varying levels of technical expertise.

Potential Use Cases

Aditude is particularly well-suited for:

  • Media Companies: Managing ad inventory across a network of websites, with centralized payment tracking and position configuration.
  • Independent Publishers: Running ads on a single site with full control over creatives and monetization.
  • Ad Networks: Facilitating ad sales for multiple clients, with support for diverse ad formats and payment methods.

Getting Started with Aditude

To explore Aditude, head to its GitHub repository at peteralcock/Aditude. The setup process is well-documented, and the repository includes code snippets, such as PHP functions for handling ad delivery and JavaScript for dynamic ad loading.

Here’s a quick overview of the setup steps:

  1. Ensure your server meets the necessary requirements (e.g., PHP, database support).
  2. Download and unzip the Aditude files from the repository.
  3. Place the files in your server’s directory and set appropriate file permissions.
  4. Navigate to the installation URL (e.g., http://yourdomain.com/yourfolder).
  5. Enter your database credentials and complete the setup.
  6. Log in to explore example campaigns and start customizing your ad management workflow.

Source: https://github.com/peteralcock/Aditude

Any questions? Just hit me up!

Read More
Detector Gadget: FIGHT CRIME WITH DATA FORENSICS

(No relation to that Inspector guy…) Detector Gadget is an eDiscovery and digital forensics analysis tool that leverages bulk_extractor to identify and extract features from digital evidence. Built with a containerized architecture, it provides a web interface for submitting, processing, and visualizing forensic analysis data.

As legal proceedings increasingly rely on digital evidence, organizations require sophisticated tools that can dissect massive data stores quickly and accurately. Enter Detector Gadget (no relation to that famous Inspector), an eDiscovery and digital forensics solution built to streamline the discovery process. By leveraging the powerful capabilities of bulk_extractor, Detector Gadget automates feature identification and extraction from digital evidence, reducing the time and complexity associated with traditional forensic methods.

Challenges in eDiscovery and Digital Forensics
The sheer volume and diversity of modern digital data create major hurdles for investigators, legal professionals, and security teams. Conventional forensic tools often struggle to handle large-scale analyses, making quick identification of relevant data a painstaking task. Additionally, it can be difficult to coordinate among multiple stakeholders—attorneys, forensic analysts, and IT teams—when the technology stack is fragmented.

Detector Gadget was developed to tackle these challenges head-on. By focusing on containerized deployment, a unified web interface, and automated data pipelines, it offers a holistic solution for eDiscovery and forensic analysis.

Containerized Architecture for Scalability and Reliability
One of Detector Gadget’s core design decisions is its containerized architecture. Each aspect of the platform—data ingestion, processing, and reporting—runs within its own container. This modular approach provides several benefits:

• Scalability: You can easily spin up or down additional containers to handle fluctuating workloads, ensuring the system meets the demands of any size or type of investigation.
• Portability: Containerization makes Detector Gadget simple to deploy in various environments, whether in on-premise servers or on cloud-based infrastructure such as AWS or Azure.
• Security and Isolation: By running processes in isolated containers, any vulnerabilities or misconfigurations are less likely to affect the overall system.

Bulk_extractor at the Core
Detector Gadget’s forensic engine is powered by bulk_extractor, a widely used command-line tool known for its ability to detect and extract multiple types of digital artifacts. Whether it’s credit card numbers, email headers, or other sensitive data hidden within disk images, bulk_extractor systematically scans and indexes vital information. This eliminates the guesswork in searching for specific data types and helps investigators home in on the exact evidence relevant to an inquiry.

The Web Interface: Streamlined Submission and Visualization
A standout feature of Detector Gadget is its intuitive web interface. Rather than grappling with command-line operations, investigators and eDiscovery professionals can:

• Submit Evidence: Upload disk images, file snapshots, or directory contents via a simple drag-and-drop interface.
• Configure Analysis: Select from various scanning options and data filters, customizing the bulk_extractor engine to focus on particular file types, geographical metadata, or communications records.
• Monitor Progress: Watch in real time as the system processes large data sets, providing rough time estimates and resource utilization metrics.
• View Results: Detector Gadget’s dashboards show interactive charts and graphs that visualize extracted features, from keyword hits to identified email addresses or financial details—making it easier to pinpoint patterns in the data.

Secure Collaboration and Audit Trails
In eDiscovery or digital forensics, it’s vital to maintain an irrefutable chain of custody and accurate tracking of user actions. Detector Gadget implements robust user authentication and role-based access controls, ensuring that only authorized personnel can perform specific tasks. Every action—from uploading evidence to exporting reports—is logged for audit trail purposes, satisfying compliance standards and safeguarding the integrity of the investigation.

Deployment and Integration
Detector Gadget also supports smooth integration with existing legal document management systems, case management platforms, and investigative workflows. The containerized design, combined with RESTful APIs, allows organizations to connect Detector Gadget’s findings with other collaboration and storage solutions. Whether you’re archiving analysis reports or triggering a deeper look into suspicious artifacts, the flexible architecture supports a wide range of custom integrations.

PROTOYPING TIME: 30m(ish)

Features

  • Digital Forensics Analysis: Extract emails, credit card numbers, URLs, and more from digital evidence
  • Web-based Interface: Simple dashboard for job submission and results visualization
  • Data Visualization: Interactive charts and graphs for analysis results
  • Asynchronous Processing: Background job processing with Celery
  • Containerized Architecture: Kali Linux container for bulk_extractor and Python container for the web application
  • Report Generation: Automated generation and delivery of analysis reports
  • RESTful API: JSON API endpoints for programmatic access

Architecture

Detector Gadget consists of several containerized services:

  • Web Application (Flask): Handles user authentication, job submission, and results display
  • Background Worker (Celery): Processes analysis jobs asynchronously
  • Bulk Extractor (Kali Linux): Performs the actual forensic analysis
  • Database (PostgreSQL): Stores users, jobs, and extracted features
  • Message Broker (Redis): Facilitates communication between web app and workers

Getting Started

Prerequisites

  • Docker and Docker Compose
  • Git

Installation

  1. Clone the repository
   git clone https://github.com/yourusername/detector-gadget.git
   cd detector-gadget
  1. Start the services
   docker-compose up -d
  1. Initialize the database
   curl http://localhost:5000/init_db
  1. Access the application Open your browser and navigate to http://localhost:5000 Default admin credentials:
  • Username: admin
  • Password: admin

Usage

Submitting a Job

  1. Log in to the application
  2. Navigate to “Submit Job”
  3. Upload a file or provide a URL to analyze
  4. Specify an output destination (email or S3 URL)
  5. Submit the job

Viewing Results

  1. Navigate to “Dashboard” to see all jobs
  2. Click on a job to view detailed results
  3. Explore the visualizations and extracted features

Development

Running Tests

# Install test dependencies
gem install rspec httparty rack-test

# Run tests against a running application
rake test

# Or run tests in Docker
rake docker_test

Project Structure

detector-gadget/
├── Dockerfile.kali             # Kali Linux with bulk_extractor
├── Dockerfile.python           # Python application
├── README.md                   # This file
├── Rakefile                    # Test tasks
├── app.py                      # Main Flask application
├── celery_init.py              # Celery initialization
├── docker-compose.yml          # Service orchestration
├── entrypoint.sh               # Container entrypoint
├── requirements.txt            # Python dependencies
├── spec/                       # RSpec tests
│   ├── app_spec.rb             # API tests
│   ├── fixtures/               # Test fixtures
│   └── spec_helper.rb          # Test configuration
├── templates/                  # HTML templates
│   ├── dashboard.html          # Dashboard view
│   ├── job_details.html        # Job details view
│   ├── login.html              # Login form
│   ├── register.html           # Registration form
│   └── submit_job.html         # Job submission form
└── utils.py                    # Utility functions and tasks

Customization

Adding New Feature Extractors

Modify the process_job function in utils.py to add new extraction capabilities:

def process_job(job_id, file_path_or_url):
    # ...existing code...

    # Add custom bulk_extractor parameters
    client.containers.run(
        'bulk_extractor_image',
        command=f'-o /output -e email -e url -e ccn -YOUR_NEW_SCANNER /input/file',
        volumes={
            file_path: {'bind': '/input/file', 'mode': 'ro'},
            output_dir: {'bind': '/output', 'mode': 'rw'}
        },
        remove=True
    )

    # ...existing code...

Configuring Email Delivery

Set these environment variables in docker-compose.yml:

environment:
  - SMTP_HOST=smtp.your-provider.com
  - SMTP_PORT=587
  - SMTP_USER=your-username
  - SMTP_PASS=your-password
  - SMTP_FROM=noreply@your-domain.com

Production Deployment

For production environments:

  1. Update secrets:
  • Generate a strong SECRET_KEY
  • Change default database credentials
  • Use environment variables for sensitive information
  1. Configure TLS/SSL:
  • Set up a reverse proxy (Nginx, Traefik)
  • Configure SSL certificates
  1. Backups:
  • Set up regular database backups
  1. Monitoring:
  • Implement monitoring for application health

Security Considerations

  • All user-supplied files are processed in isolated containers
  • Passwords are securely hashed with Werkzeug’s password hashing
  • Protected routes require authentication
  • Input validation is performed on all user inputs

Future Development

  • User roles and permissions
  • Advanced search capabilities
  • PDF report generation
  • Timeline visualization
  • Case management
  • Additional forensic tools

Troubleshooting

Common Issues

Bulk Extractor container fails to start

# Check container logs
docker logs detector-gadget_bulk_extractor_1

# Rebuild the container
docker-compose build --no-cache bulk_extractor

Database connection issues

# Ensure PostgreSQL is running
docker-compose ps db

# Check connection parameters
docker-compose exec web env | grep DATABASE_URL
Read More

Recent Posts

  • Case Study: VisionaryOptics.com
  • HOW TO USE A.I. AND RSS FEEDS TO MAKE MONEY BETTING ON EVERYTHING ALL DAY LONG
  • Get Rich Quick: Ai For Gambling
  • Welcome To Rushmore: Ai-Powered Online Learning Platform For Educators
  • RoadShow: AI-Powered Under-priced Antique Analysis

Sleepless in Brooklyn